
Tech
How to Remove Distractions from Travel Photos Using an AI Object Remover
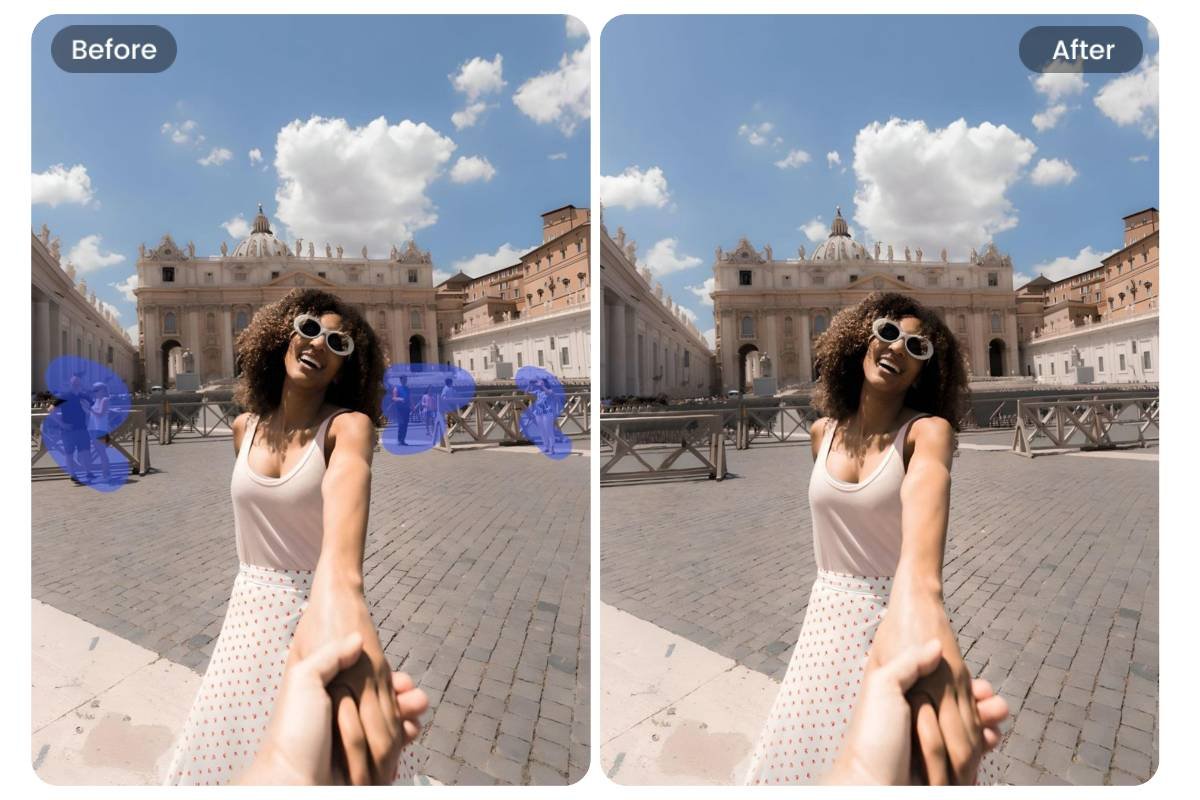
Travel photos are some of the most cherished keepsakes, capturing the beauty of new destinations and unforgettable experiences. However, it’s not uncommon for these images to include unwanted objects or people that distract from the scene’s natural charm. Whether it’s a photobomber, stray trash, or a distracting element in the background, removing these objects can dramatically improve your travel photos.
This guide explores how to use an online AI photo eraser, such as ObjectRemover.AI, to clean up your travel photos, creating images that truly reflect the moment’s beauty.
Why Remove Objects from Travel Photos?
Even the best-planned shots can be disrupted by unexpected elements. Removing objects from travel photos helps:
- Focus on the Destination: Eliminate distractions and emphasize the location’s natural beauty.
- Preserve Memories: Create cleaner, more aesthetic visuals for photo albums or social media.
- Professionalize Images: Enhance photos for blogs, portfolios, or other creative projects.
An AI object remover is a quick and accessible way to achieve these polished results, even without professional editing skills.
What Is ObjectRemover.AI?
 ObjectRemover.AI is a free, online image editing tool that uses advanced algorithms to remove objects from photos seamlessly. By analyzing the surrounding pixels, it replaces unwanted elements with background details, ensuring the edits look natural. This AI photo eraser supports popular image formats such as JPG, PNG, and WebP, and can process files up to 50MB in size.
How to Do It?
Step 1: Select the Right Photo
Choose a travel photo that you want to enhance. Look for images where distractions like photobombers, signage, or trash bins detract from the composition. Ensure the photo is in a supported format and within the size limits of the object remover.
Step 2: Upload the Photo to the Object Remover
Visit ObjectRemover.AI and upload your selected photo. Drag and drop the file or click the upload button to select it from your device. The intuitive interface makes it easy to start editing right away.
Step 3: Highlight Unwanted Objects
Once the photo is uploaded, use the selection tool to mark the objects or people you want to remove. Common examples include:
- Photobombers: Individuals unintentionally captured in your shot.
- Trash or Litter: Items that clutter natural landscapes.
- Utility Poles or Wires: Elements that disrupt scenic views.
- Obstructive Shadows: Shadows cast by unwanted objects or people.
Be as precise as possible while selecting the objects to ensure accurate and seamless removal.
Step 4: Apply Object Removal
After highlighting the unwanted elements, let the AI tool process the image. The algorithm analyzes the surrounding pixels and fills in the gaps left by the removed objects. This ensures the photo retains its original quality and looks unaltered.
Step 5: Review and Refine
Once the object removal is complete, review the edited photo. If any areas look inconsistent or require further adjustments, use the selection tool again to refine the edits. The goal is to achieve a polished image with no visible signs of alteration.
Step 6: Save and Share
When satisfied with the results, download the edited photo in high quality. You can now share your enhanced travel images on social media, add them to photo albums, or use them in creative projects.

Tips for Removing Objects from Travel Photos
Focus on Composition
When editing, ensure that the composition remains balanced. Removing objects should enhance the photo’s natural flow and draw attention to key elements, such as landmarks, landscapes, or architectural details.
Prioritize Natural Backgrounds
Object removal works best when the background is simple and consistent, such as a clear sky or a grassy field. Complex backgrounds may require extra attention to ensure seamless edits.
Maintain Realism
While it’s tempting to remove every imperfection, over-editing can make photos look unnatural. Focus on removing the most distracting elements while preserving the integrity of the scene.
Use High-Resolution Photos
High-resolution images provide more data for the AI to analyze, resulting in cleaner and more realistic edits. Whenever possible, upload the highest-quality version of your photo.
Advantages of Using an Online AI Photo Eraser
Accessibility
ObjectRemover.AI is a browser-based tool, meaning you can access it on any device with an internet connection. There’s no need for expensive software or technical expertise.
Free and Unlimited
The platform allows users to remove objects from photos for free, with no usage limits. This makes it an excellent choice for travelers who want to edit multiple images without incurring costs.
Quick and Efficient
The AI algorithms process images quickly, delivering results in seconds. This is especially convenient when editing photos on the go.
User-Friendly Interface
ObjectRemover.AI’s intuitive design ensures that even first-time users can achieve professional-looking results with minimal effort.
Common Challenges and Solutions
Removing Objects from Crowded Photos
Photos with busy backgrounds or overlapping elements may pose a challenge. In such cases, use the selection tool carefully and refine the edits as needed. For highly complex images, consider breaking the process into smaller steps.
Preserving Shadows and Lighting
Removing an object can sometimes alter the lighting or shadows in a photo. To maintain realism, focus on blending the edited area with the surrounding environment.
Editing Low-Quality Photos
While the AI photo eraser works well with most images, low-quality photos may yield less seamless results. Start with clear, high-resolution images for the best outcomes.
Conclusion
Travel photos are more than just pictures; they’re memories of experiences and adventures. By using an AI object remover like ObjectRemover.AI, you can enhance these images by removing unwanted distractions, creating cleaner and more visually appealing compositions. Whether you’re editing a photo for personal keepsakes or professional projects, this tool simplifies the process and delivers stunning results. With just a few clicks, you can transform your travel photos into polished works of art that truly capture the essence of your journey.


Text to Video AI: Turn Ideas into Stunning Videos with a Prompt

How Policy Charges Affect Your Returns Over the Long Term
5 Best Cloud Phone in 2026 for Mobile Account Operations

Laser Drilled Microvia Technology: Design Principles for Reliable HDI PCB Manufacturing

How Long Do Samsung Phones Last? Lifespan, Software Updates, and the Right Time to Upgrade

Godrej Washing Machines in 2026: Types, Prices, and What to Know Before Buying

TrendyTech’s Data Engineer Training: Build Skills for a Successful Career

Why FastTurnPCBs Matters for High-Frequency PCB Projects

CurlyMe Hair Half Wigs & Crochet Hair For Summer Protective Style
5 Simple CNC Tooling Choices That Improve Shop Efficiency
CurlyMe Hair Half Wigs & Crochet Hair For Summer Protective Style
5 Simple CNC Tooling Choices That Improve Shop Efficiency
How Trading Apps Are Shaping the Future of Retail Investing

Migrating from Prometheus to VictoriaMetrics: A Step-by-Step Guide
TrendyTech’s Data Engineer Training: Build Skills for a Successful Career
Why FastTurnPCBs Matters for High-Frequency PCB Projects
Godrej Washing Machines in 2026: Types, Prices, and What to Know Before Buying
How Long Do Samsung Phones Last? Lifespan, Software Updates, and the Right Time to Upgrade
Laser Drilled Microvia Technology: Design Principles for Reliable HDI PCB Manufacturing
5 Best Cloud Phone in 2026 for Mobile Account Operations


 Tech2 years ago
How to Use a Temporary Number for WhatsApp
- Business2 years ago
Sepatuindonesia.com | Best Online Store in Indonesia
- Social Media2 years ago
The Best Methods to Download TikTok Videos Using SnapTik
- Technology2 years ago
Top High Paying Affiliate Programs
- Tech1 year ago
Understanding thejavasea.me Leaks Aio-TLP: A Comprehensive Guide
- FOOD2 years ago
How to Identify Pure Desi Ghee? Ultimate Guidelines for Purchasing Authentic Ghee Online

 Instagram4 years ago
Free Instagram Auto Follower Without Login
- Instagram4 years ago
Free Instagram Follower Without Login